
I bet all of us have this one doll at the bottom of a box...a poor ugly duckling Fleur who unpatiently waits to be rescued!
Fleur dolls don't age well, when played with they often loose their lashes, the hair gets super frizzy and dry, the body breaks or the rubber inside detoriates. We collectors often get them in a lot with other , prettier Fleurs and put them away into that box where they wait unloved untill we finally find some time to be their good fairy and bring back their beauty! For me, this is one of the best things of collecting! I love restoring dolls!
In this blog post I share with you my experiance in doll restoring with a step by step tutorial on how to make your Fleur doll pretty again!


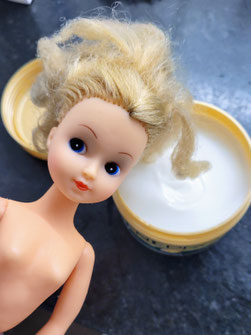
This little doll is our ugly duckling. As you can see, her hair is a mess and she doesn't have any lashes left. The hair is stiff and knotted.
The hair treatment
If you collect other dolls as Fleur as well, you have noticed, that the quality of Fleur's hair is often very bad compared to Barbie or other dolls. The hair fiber becomes rough and dry with aging, sometimes even brittle. Often it's not possible to make the hair like new again but we can for sure improve her look a lot!
The first step is to wash the mess...I mean the hair. You can use any shampoo or dish washer or even soap for it, it doesn't matter. The scalp won't be irritated...it's plastic!
After washing I put hair conditioner on the hair. The brand isn't important as long as it's a conditioner that makes the hair soft. It works wonders on synthetic hair as well. Make sure to not be greedy with the conditioner and cover every single hair. Let it sit for a while, the longer, the better!


The next step is to brush the hair while the conditioner is still on the head. I use a 80s Barbie brush, but you can also use a fine comb. You have to be very carefull while brushing. Best is to start at the tips and work yourself up to the head. Make sure to hold the hair firm while brushing, so it doesn't come out of the head. It still can happen, so don't panic! A certain amount of hair will come out, no matter how careful you are. But let's try to make it not too many!
If she still has some curls, comb the curly end over your finger. Like this you can bring back the curly shape to the hair strand.
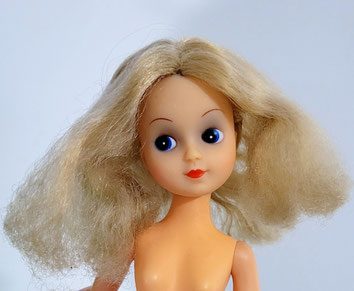
And here she is after brushing. The knots are gone and the hair is much softer now. Unfortunattely the endings are very frizzy and dry and I couldn't save most of the the curls. Only one streak of hair at the back still has the curly shape, the rest is gone.


Let's style it!
Of course Fleur can't stay like this. This pretty little doll likes her hair styled and her favorite hairstyle is her signature flip...the Fleur flip. This means, she needs to have the end of her hair curled. But before we curl the hair, we need to get rid of the terrible frizz which is pretty heavy as you can see.

To get rid of the frizz we need to straighten the hair. This is actually a method I learned from another collector ( if you read this Patricia, thank you!). There are special mini hair straighteners out there but I use a normal human size hair straightener, that I use also on my own hair.
On the left picture part of her hair is already straightened. You have to set the heat to the minimum (140° with mine) and the hair needs to be wet...really wet. The strands have to be small and you have to pull it very quicklly through the iron, if you leave it to long inside, the hair will melt. And Fleur doesn't like melted hair! Sometimes you have to repeat the process several times, and sometimes the frizz is too strong and won't get away completely.
before
Another before and after comparison:
The hair is now smooth and much less frizzy. You can cut the endings a little bit if you want to style the hair loose. Because I want to make the flip, I didn't cut the endings.
after


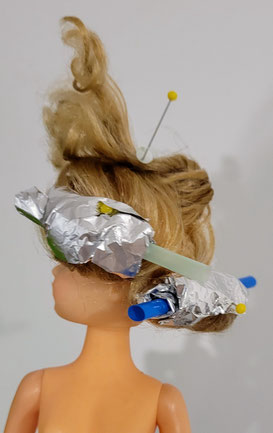
The next step is making the outside curl with the boil-perm method. I spared a streak from the back which still has intact curls.
I put the rest of the hair on self made curlers (made out of aliminium foil and drinking straws) and fastened them with pins to the head. Than I poured hot, nearly boiling water several times over the curlers and after that I put the head in cold water to set the curl. Fleur's hair doesn't need much heat to curl, you don't need to put it into boiling water for several minutes like you need to do with saran hair. Fleur's hair reacts to heat immedietely. For an optimal curl you need to let it dry on the curlers.


I removed the curlers while the hair was still wet, because I don't need defined curls for the Fleur flip hairstyle.
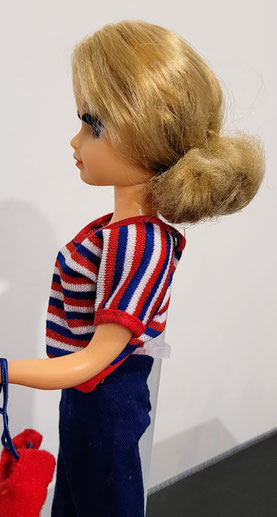
Now you need a rubber band that is not too tight. You have to pull all the hair through the rubber band like a ponytail and than place the rubber band down where you want your flip to be. After that comb the hairends over your finger into a big outside curl. Than put the hair endings inside the rubber band with your fingers or twizzers. Voilà, the Fleur flip!


The lashes

To restore Fleurs lashes you can use any false lashes that are out there. She can wear any look and will look gorgeous.
If you want the lashes to look as much as original as possible, the best lashes are single flats in the thickness 0,2mm (or thicker) and D-Curl. I have bought them in different lengths, the shorter the lashes, the closer is the curl to the base, which makes the end result more curled. So I can experiment with her looks.
First you need to cut the lashband into two pieces, that fit into the eye gap. Than put the base on a clear adhesive tape and put another tape over the tape and the lashbase (adhesive to adhesive!), so the base of the lashes is inside the tape. After that cut the tape so it fits into the eye gab. The tape part is important to give the lashes stability and let them stay in place.


Now shorten the lashes to the right length. It depends on your taste, how long you like your Fleur lashes to be. Make sure to cut them as even as possible, to make them look original.
Than insert the lashes into the eye gap with twizzers or your fingers, but don't break the lashes accidently!
Finished!!!
The comparison
Doesn't she look utterly cute now???
before

after

Finished result


I hope you enjoyed this small little tutorial! And maybe you'll give your little ugly duckling Fleur a make over with these instructions! If you do, please send me a before-after photo! I would love to see it!!!
If you want to know how to restring a Fleur body, please tale a look at this tutorial by Angela.
If you have any questions about repairing and restoration send me a message to allaboutfleur@gmx.de.
Write a comment